GrooveMail Review
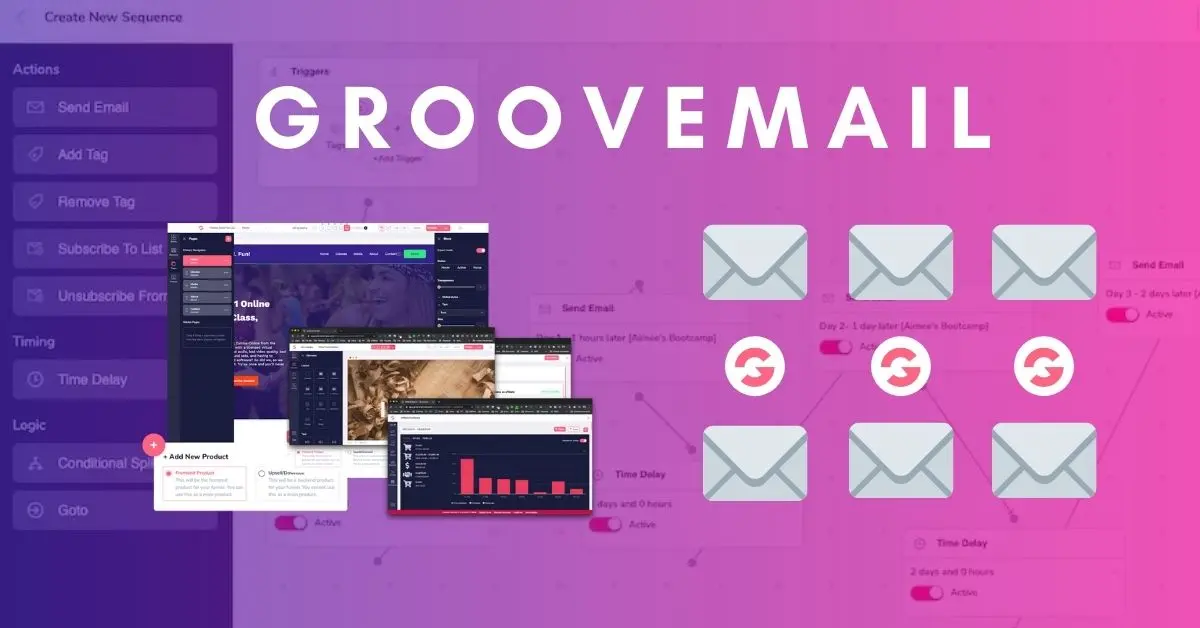
GrooveMail – GrooveFunnels Email Marketing & Automation
GrooveMail is a powerful email marketing and marketing automation platform. Your free GrooveMail account allows you to:
Build targeted email lists and customer lists
Send out email marketing campaigns like broadcasts and email sequences
Create marketing automations based on users behaviors
Add up to 500 contacts on your free account.
GrooveMail Review 2021
In this up to date GrooveMail review, I’ll cover:
What GrooveMail is
GrooveMail Pros & Cons
GrooveMail Tutorial
GrooveMail Frequent Asked Question
Bonuses For Free GrooveMail Account
What is GrooveMail?
GrooveMail is a full featured email marketing and CRM system. If you have an online business or a digital marketer – you should be actively building your email list to nurture and build relationships.
It’s similar to ActiveCampaign and Clickfunnel’s Actionetics email marketing service.
GrooveMail lets you turn on a host of automations based on your recipients’ behaviors.
For example:
Add a contact from one existing email list to another email list
Add and remove tags on a contact’s profile
Automatically subscribe or unsubscribe contacts to an email sequence
Assign a tag if a contact purchased a product and automatically add them to memberships
Define unlimited rules like initiate IF a contact does then THEN do this!
Advanced features where you can queue up your email and SMS communications, and let the system pace them out based on your pre-defined parameters is coming soon.
The best part is that it’s integrated with all the Groove apps on the GrooveFunnels platform.
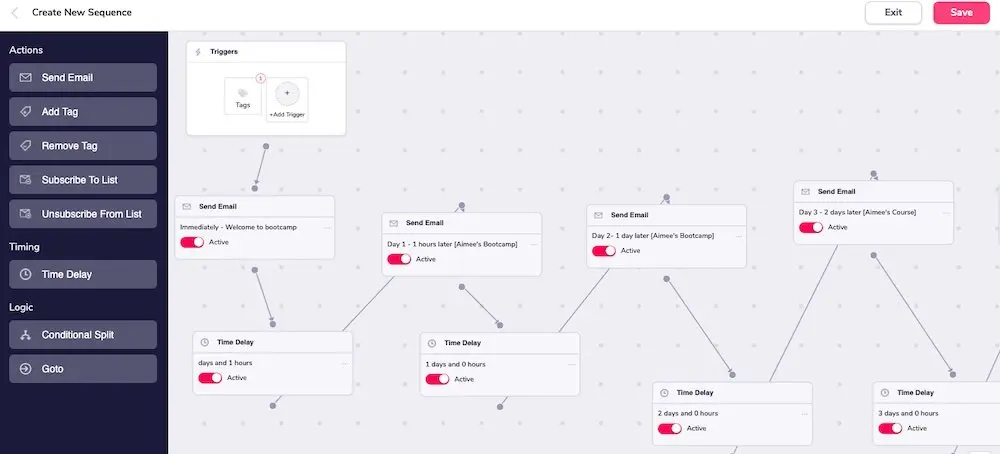
Here’s a peak inside the dashboard when you’re creating an email autoresponder or sequence:
GrooveMail Pros & Cons
Pros
In your FREE GrooveFunnels Account you can add up to 500 contacts
In your platinum lifetime account, you can add up to 10,000 contacts
Create as many “from sender IDs” or alias as you want for multiple website
Use tags to segment your email list or use tags to fire off marketing automations
Create various marketing automations to other groove apps like GrooveMember & GrooveSell
Send out email broadcasts instantly or schedule at a future date
Create email autoresponders when someone opt-ins to a specific form or create an automation to fire off an email sequence
Trigger a person to be added to GrooveMember when they opt-in to a specific form
Add custom fields in your forms that go beyond first name and email
Get Analytics on your leads, email list, broadcasts and email sequences
Cons
Their automations features was buggy in the first few months but is now working
No email templates however that is coming soon
GrooveMail Tutorial
It’s best to have the following pages setup:
1. Opt-in Page
2. Thank You Page
3. Download Page
Step 1. Configure Your Sender Email Setting
When you first login to GrooveMail, you will need to configure your email settings and set up sender Ids.
Click on Settings
Click Senders
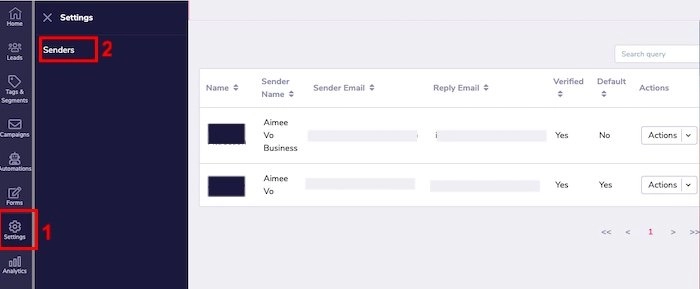
This is where you can add as many sender names and emails as you like.
For example, if you have multiple websites you can have a unique sender name and email address per website.
Over on the top right, click “New Senders”.
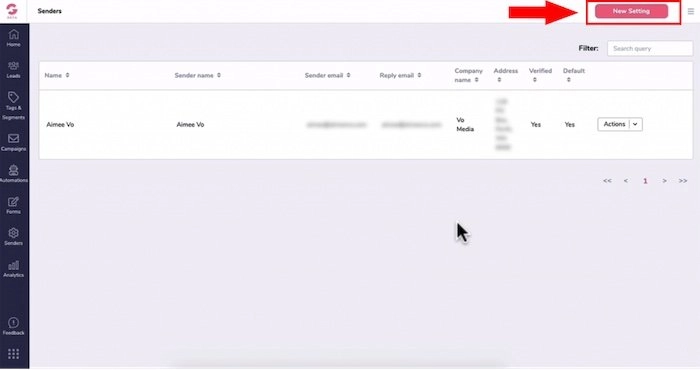
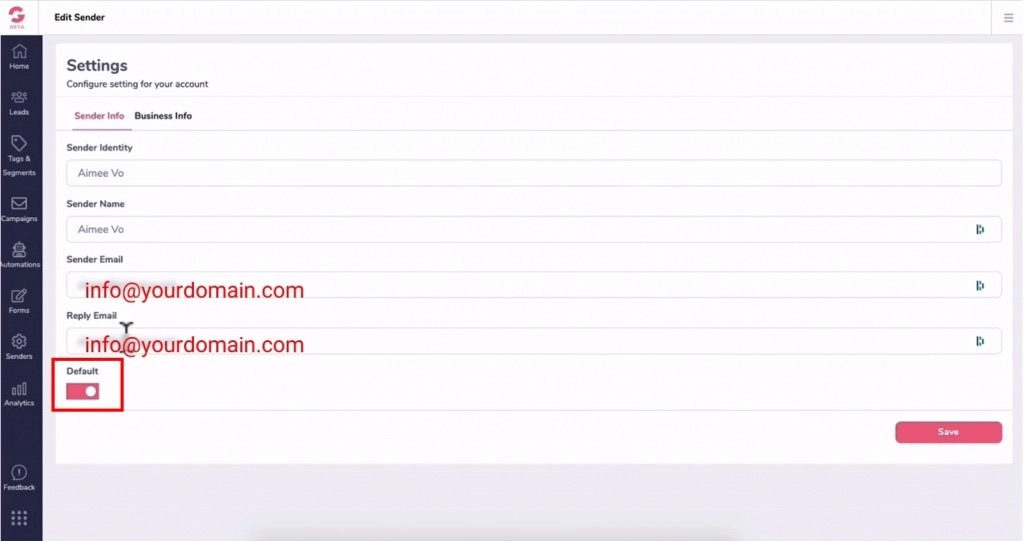
Under Sender Info heading, in “Sender Identity”, enter in your name or your company
Under “Sender Name”, enter in your name
“Sender Email”, this is the email address for that sender name so for example, it could be “[email protected]”.
“Reply Email”, you can have it set to the same email like “[email protected]” or add a separate email for the help desk.
Below you’ll see a “Default” tab, you can switch the tab to the right if you like this to always be the default email for your email campaigns.
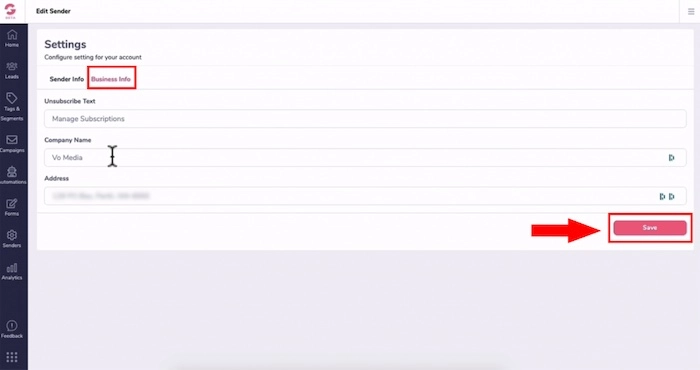
Head up top and click on “Business Info”.
In the “Unsubscribed Text”, enter in your own unsubscribed text. For example, “Manage Subscriptions”.
Under “Company Name”, put your company name there or it could be your own name. For example “Aimee Vo”.
Under “Address”, enter your mailing address and then click “Save”.
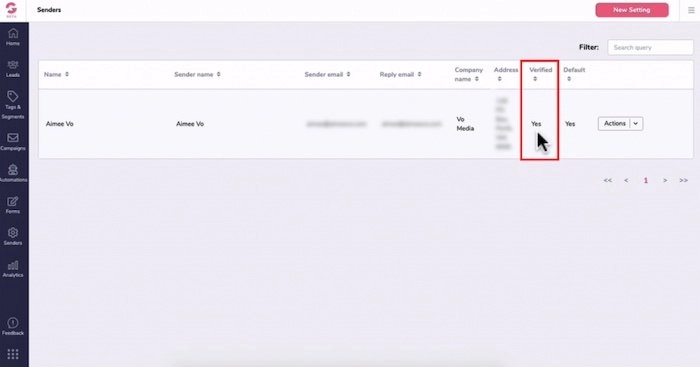
The sender details will load on the screen but what you will notice under “Verified” it would say “No”.
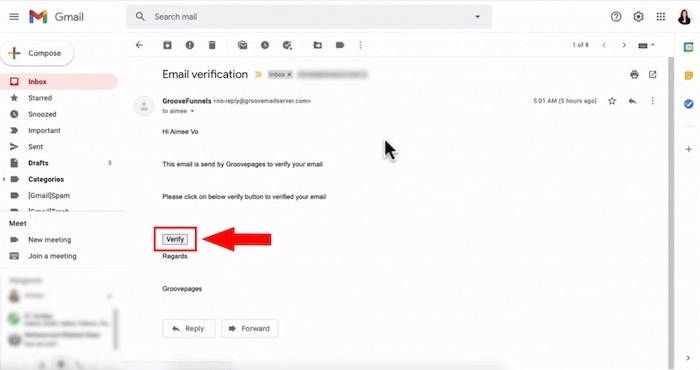
The moment you click on that save button, you will be sent an email verification notice from GrooveFunnels that looks like the image below
Log in to your email as soon as possible and open the mail from GrooveFunnels and you click on the “Verify” button
Note: There is an expiry period to that verification email. If you clicked on it at a later date, it may not work
Your status under Verified will go from NO to a YES.
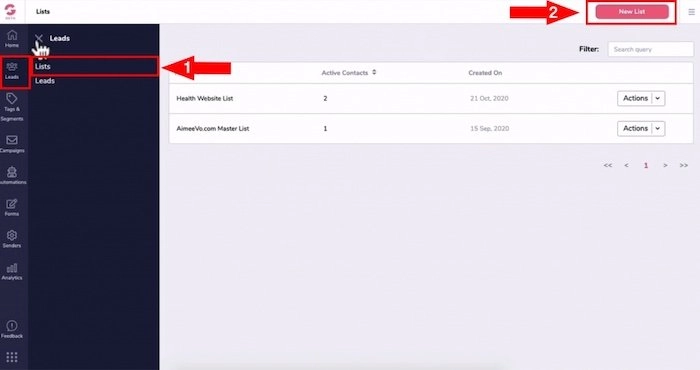
Step 2. Create An Email List
Create an email list per website or funnel.
You’ll find the email list under “Leads” in the left panel and under it select “Lists”
For the purpose of this tutorial, I’ve already created a list called “health website list”
Your status under Verified will go from NO to a YES.
Create an email list per website or funnel.
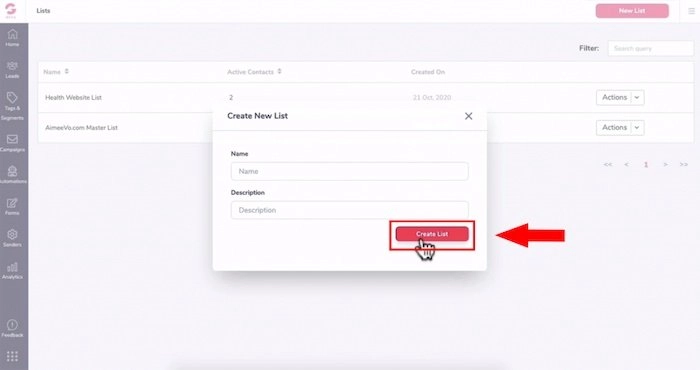
A pop up will appear asking for the list’s details so enter in the name of the list like “yourdomain.com master list” and a description then click on “Create List”.
TIP: create one email list per website and use tags to segment that list.
Step 3. Create Tags
To create tags, you will go to “Tags & Segments” on the left panel then click on “Tags”
Click on a “New Tag” on the top right corner of the page.
Copy the tag from the spreadsheet then paste it in under the “Name” and give it the same description.
Under category, you can group your tags into categories.
So let’s say that you have a bunch of tags for freebie email opt-ins and another category for buyers.
For this example, you might want to create a category called “prospects”.
In order to create a category, click on “Create New Category”.
Type in the name of the category and click the “+” then I’ll click on “Create Tag”

TIP: You can create as many tags as you like however I recommend keeping it simple, ideally one tag per opt-in form.
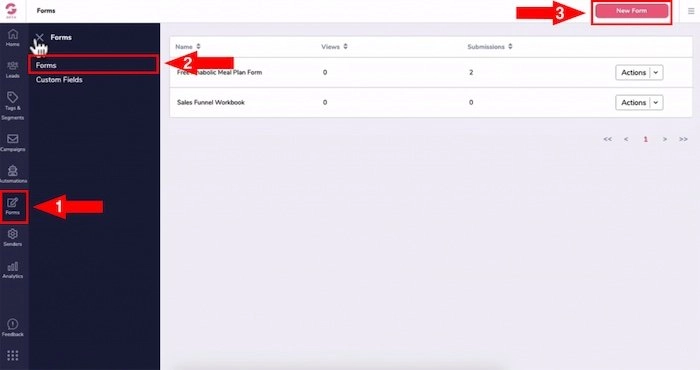
4. Creating An Opt-in Form
Let’s head back to GrooveMail and click on “Forms” on the left column and select “Forms”.
If we cross-check over Google sheets, you can see that I’ve got a form name: “Free anabolic meal plan”.
For you to create a new form, click “New Form” on the top right of the page.
If your opt-in form is going to be for people who subscribe to your newsletter, you might name this form “newsletter”.
If it’s a free lead magnet, then you would name it “free lead magnet”.
So name your form that you would easily remember and then press save.
From here, it’s pretty straightforward and there are five steps involved…
1. Form fields:
So by default, the email form field is up top and if you want the first name form field to be up on top, you would need to click on the arrow beside it then it automatically reorders itself.
If you like to add more fields, click on the “+ New Field”.
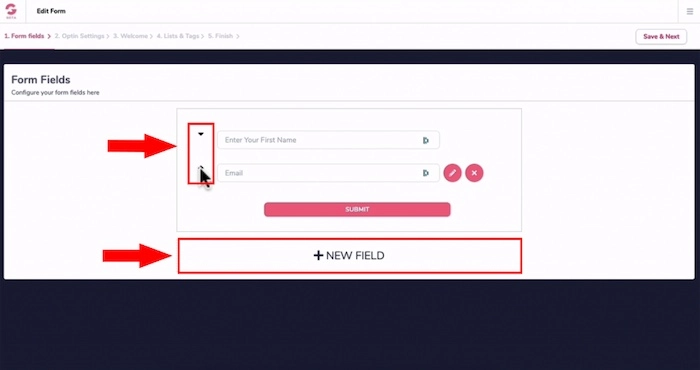
Under “Field Identifier”, click on the drop-down arrow and you select the form field that is available.
Let’s say you’d like people to provide their phone number, you can select “phone” and then click on save.
You can also create your own custom field by clicking on “Create a custom field” and filling out all the details.
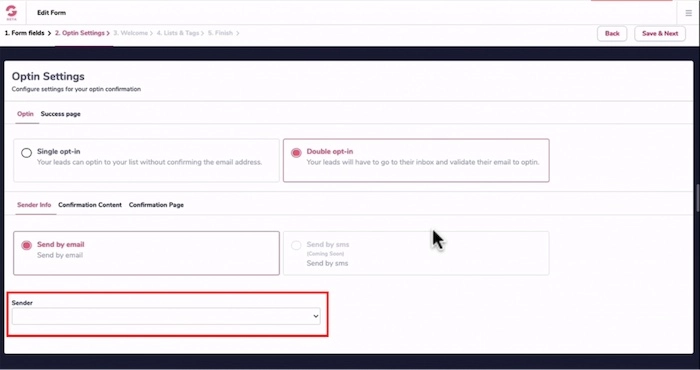
2. Opt-in Settings
Under “Optin”, I recommend you choose a double opt-in versus a single opt-in confirmation.
Single opt-in is when people don’t need to go back to their email inbox to click on a confirmation link.
Double opt-in requires them to check their email inbox and click on a confirmation link.
TIP: Choose a double opt-in because if someone clicks on your email confirmation, they’re essentially giving you permission to email them.
Your future emails are less likely to be marked as spam or go to the promotions inbox. It also helps with a higher email delivery rate.
Under “Sender Info”, leave it checked at “Send by email” because SMS is not available yet.
Under the “Sender”, click on the drop-down and select your sender name which was set up in the first step.
Next, head to the “Confirmation Content” tab.
In the “Subject”, you would enter your subject headline which I’ve already written out a subject headline as seen on the image below.
Then under the “Preview”, this is a sentence where people can see a text snippet of their email before they open it.
Over in the left-hand column, you could see the “Dynamic Variables” which are the short codes to insert in your email body for personalization.
For example, since we ask for the first name in the opt-in form, we can say “Hey {first_name},” and write the email body copy.
Now you need to leave the “{optin_confirmation_link}” short code in place and don’t delete it because this will be the confirmation link where people will need to click on, in order to receive your freebie or your lead magnet.
.webp)
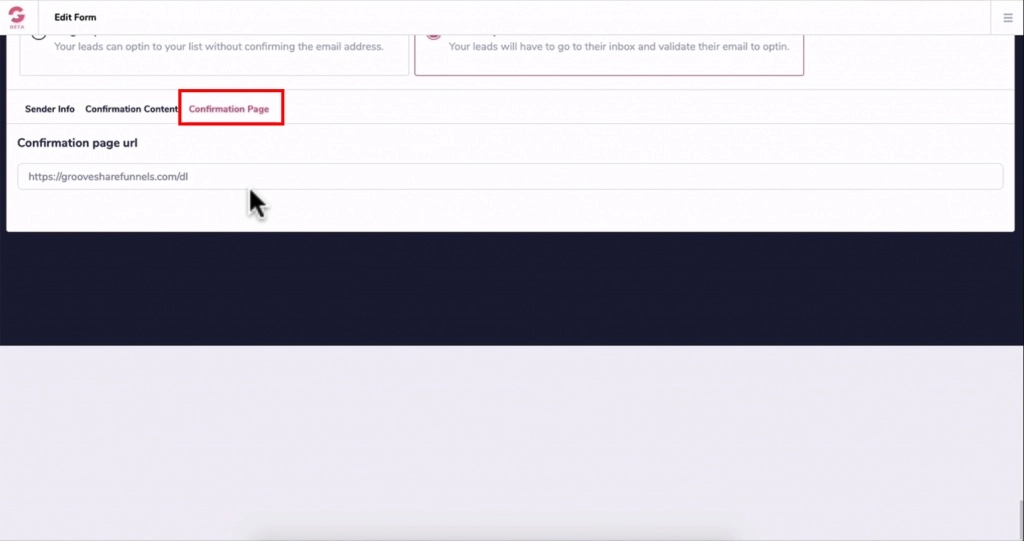
Once you added in your email copy, head up and click on the “Confirmation Page”.
Under the “Confirmation page URL”, you will need to enter the URL of the download page.
So once someone clicks on the confirmation link, they will be redirected to the download page where they can download their freebie.
Let’s head back on top and click on the “Success page”.
The “Success page URL” will be the next page in the funnel once someone enters their name and email to get your freebie.
In this example, I’m going to add the “thank you page URL” then once you’ve done so, click on “Save & Next”.
3. Welcome Email Setting
For your welcome email settings, it’s defaulted to your sender name however you can also choose not to send a “Welcome email”.
But for those that want to…
Under “Subject”, think of this as the first welcome email to introduce yourself.
The “Preview” is where people can see a text snippet of their mail before they open it.
And you can format your copy in the body using the toolbar.
To save time, I’ve created an example of the subject headline, preview, and the copy which you can see on the image below.
So once you enter any personalization and your email copy, or if you plan not to send a welcome email just head up then click on “Save & Next”.

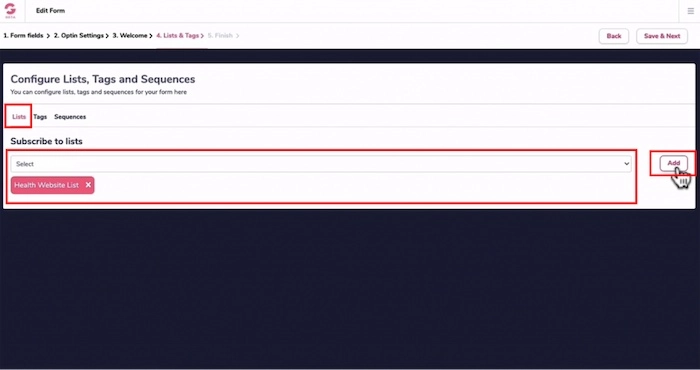
4. Configuring List, Tags and Sequences
Under “List“, for this example we want people to subscribe to the “Health Website List”.
In order to add a list, click on this drop-down arrow and select the list that you created then click “Add”.
And that’s how you add your email list.
Head to the top and click on “Tags”.
Click on “Yes, assign tags”, and under the first box, select the category that we created earlier which is “prospect”.
In the next section, select the specific tag and click on “Add”.
So now you will have the “Free anabolic meal plan tag” added to your Health Website List.
5. Finish
Grab the embed code to embed your form onto GroovePages or any landing page builder.
.webp) Get GroveMail & GrooveFunnels For Free
Get GroveMail & GrooveFunnels For Free
GrooveMail Frequent Asked Questions
How Much Does GrooveMail Cost?
If you’ve locked in a free account with GrooveFunnels, you can use GrooveMail at no cost and build an email list of up to 500 contacts.
If you purchased the GrooveFunnels Lifetime deal, you’re getting more premium email marketing features, eliminated monthly recurring expenses and can build an email list of up to 10,000 contacts.
Since GrooveMail is an app on the GrooveFunnels platform, check out my GrooveFunnels platinum lifetime review.
How Many Sender Emails Can I Send?
In your free account, you can add one sender ID email however in the groovefunnels platinum lifetime you can add unlimited email IDs.
How Many Contacts Do I get On The Free Vs Paid Version?
.500 email contacts on the free version and 10,000 contacts on the Paid Lifetime version.
Can I Import my Existing Email list?
Importing emails from another email marketing provider won’t be available until June 2021.
Can I use Gmail as a verified Sender?
To reduce spam and email delivery in GrooveMail, you will need to setup a domain email like [email protected].
Do I still Need Hosting for Emails?
Yes, GrooveMail does not provide you with a free email address. You will need to have separate hosting for your own branded domain email address.
I have My Domain On Cloudflare, How Do I Make Sure It Works With GrooveMail?
Ensure that you have added MX records into Cloudflare pointed to your email hosting provider.
© Groove Review 2021